 TeamViewer 7
How to uninstall TeamViewer 7 from your PC
You can find on this page details on how to remove TeamViewer 7 for Windows. The Windows release was developed by TeamViewer GmbH. More data about TeamViewer GmbH can be read here. Usually the TeamViewer 7 program is found in the C:\Program Files (x86)\TeamViewer\Version7 directory, depending on the user's option during install. C:\Program Files (x86)\TeamViewer\Version7\uninst.exe is the full command line if you want to remove TeamViewer 7. TeamViewer 7's primary file takes about 7.10 MB (7445416 bytes) and is named TeamViewer.exe.The executable files below are installed along with TeamViewer 7. They take about 13.33 MB (13974585 bytes) on disk.
- rClientID.exe (434.03 KB)
- TeamViewer.exe (7.10 MB)
- TeamViewer_Desktop.exe (2.18 MB)
- TeamViewer_Service.exe (2.55 MB)
- tv_w32.exe (103.91 KB)
- tv_x64.exe (126.41 KB)
- uninst.exe (434.32 KB)
- uninstall.exe (439.64 KB)
The current page applies to TeamViewer 7 version 7.0.13989.0 alone. You can find here a few links to other TeamViewer 7 versions:
How to remove TeamViewer 7 from your PC with Advanced Uninstaller PRO
TeamViewer 7 is an application released by TeamViewer GmbH. Sometimes, people try to erase this program. This can be easier said than done because performing this by hand requires some advanced knowledge related to Windows program uninstallation. One of the best SIMPLE action to erase TeamViewer 7 is to use Advanced Uninstaller PRO. Here is how to do this:1. If you don't have Advanced Uninstaller PRO already installed on your system, add it. This is a good step because Advanced Uninstaller PRO is a very useful uninstaller and general tool to optimize your system.
DOWNLOAD NOW
- go to Download Link
- download the program by clicking on the green DOWNLOAD button
- install Advanced Uninstaller PRO
3. Click on the General Tools category

4. Click on the Uninstall Programs feature

5. All the applications existing on the computer will be made available to you
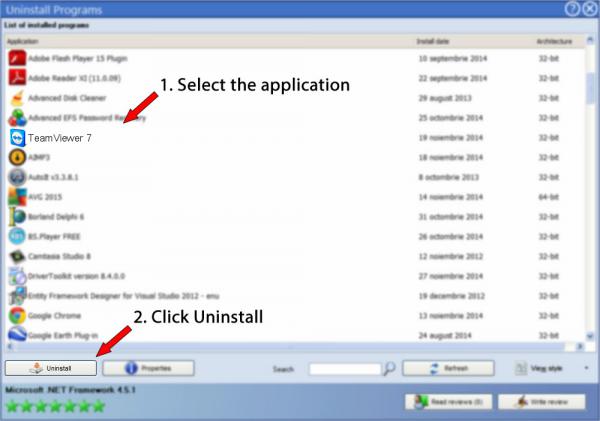
6. Scroll the list of applications until you find TeamViewer 7 or simply activate the Search feature and type in "TeamViewer 7". The TeamViewer 7 application will be found automatically. When you click TeamViewer 7 in the list of applications, some data about the program is available to you:
- Star rating (in the left lower corner). The star rating tells you the opinion other people have about TeamViewer 7, from "Highly recommended" to "Very dangerous".
- Opinions by other people - Click on the Read reviews button.
- Technical information about the app you are about to uninstall, by clicking on the Properties button.
8. After removing TeamViewer 7, Advanced Uninstaller PRO will ask you to run a cleanup. Click Next to perform the cleanup. All the items that belong TeamViewer 7 which have been left behind will be detected and you will be able to delete them. By removing TeamViewer 7 with Advanced Uninstaller PRO, you can be sure that no Windows registry items, files or directories are left behind on your PC.
Your Windows computer will remain clean, speedy and ready to take on new tasks.
Geographical user distribution


Disclaimer
The text above is not a piece of advice to remove TeamViewer 7 by TeamViewer GmbH from your computer, nor are we saying that TeamViewer 7 by TeamViewer GmbH is not a good application for your PC. This text only contains detailed instructions on how to remove TeamViewer 7 in case you decide this is what you want to do. The information above contains registry and disk entries that our application Advanced Uninstaller PRO discovered and classified as "leftovers" on other users' computers.
2016-12-28 / Written by Andreea Kartman for Advanced Uninstaller PRO
follow @DeeaKartmanLast update on: 2016-12-28 20:52:43.427